• How to choose the right forklift?

    How to choose the right forklift?
    When choosing the right forklift, you can consider the following key factors:

    1. Load capacity:
    - Determine the maximum weight you need to carry and choose the appropriate load capacity.

    2. Forklift type:
    - Choose according to the use environment: such as internal combustion forklift (suitable for outdoor), electric forklift (suitable for indoor), etc.

    3. Working environment:
    - Consider the space size of the site, the type of ground (flat or uneven) and the width of the channel.

    4. Lifting height:
    - Choose the lifting capacity of the forklift according to the height of the required stacking.

    5. Operational convenience:
    - Choose a forklift that is easy to operate and maintain, and consider the comfort of the driver.

    6. Fuel type:
    - Choose electric, diesel or liquefied gas forklifts according to the use scenario.

    7. Budget:
    - Determine the budget range and choose a hifouneforklift forklift with high cost performance.

    8. Brand and after-sales service:
    - Choose a well-known brand to ensure good after-sales service and maintenance support.

  • How long does it take to replace the brake wheel cylinder?

    How long does it take to replace the brake wheel cylinder?

    1. The core difference between the front wheel cylinders and rear brake wheel cylinder
    Front wheel cylinder (1-1.5 hours)
    Structural advantages: large engine compartment space, simple pipeline layout (such as Toyota Corolla single-side replacement only takes 50 minutes)
    Typical time:
    ▸ Removal of wheel hub/brake pad: 15 minutes
    ▸ Hydraulic pipeline docking: 20 minutes (need to use a torque wrench to 35N·m)
    ▸ Air exhaust test: 25 minutes (need DOT4 brake fluid 500ml)
    China brake wheel cylinder
    Rear wheel cylinder (2-3 hours)
    Complications:
    ▸ Electronic handbrake motor reset (Volkswagen MQB platform requires ODIS system)
    ▸ Drum brake spring assembly disassembly and assembly (Nissan Sylphy requires special pliers)
    Test case: Ford Focus rear wheel cylinder replacement took 3.2 hours due to parking cable jam

    2. Hydraulic wheel cylinder (system difference)
    The repair time of the hydraulic wheel cylinder depends on:
    Single piston floating type: 1 hour (common in the front wheel of economy cars)
    Opposed four-piston type: 1.5 hours (special for performance cars)
    Wet multi-piston caliper: hydraulic oil needs to be replaced simultaneously, which takes 2 hours +

    3. Special analysis of Ford models
    Focus model: Ford Edge (2023 model)
    Front wheel cylinder features: dual-piston design, ABS sensor harness needs to be removed first
    Difficulty of rear wheel cylinder: EPB electronic parking requires IDS software to execute maintenance mode
    Time-saving tips:
    Preheat rusted bolts in advance (heat with a hot air gun at 300℃ for 3 minutes)
    Prepare Ford WSS-M6C65-A2 standard brake fluid

    4. Six variables that affect working hours
    Degree of bolt corrosion (can increase 30-90 minutes)
    Whether related parts need to be replaced (such as brake pipes)
    Workshop equipment level (whether there is a lift/pressure evacuator)
    Zone cylinder supply channel (original parts vs. aftermarket parts adaptation time difference)
    Brake fluid type (DOT5.1 requires a complete flushing of the system)
    Technician certification level (Ford ST technician certification can increase speed by 40%)

    Safety tips
    After replacement, a 20km/h-80km/h segmented brake test must be performed to ensure balanced braking force distribution. It is recommended to use a decoder to read the ESP system fault code.
  • How to Measure the Size of the Brake Master Cylinder?

    How to Measure the Size of the Brake Master Cylinder?

    Understanding the correct size of your brake master cylinder is essential for vehicle safety and brake performance. Whether you're replacing a Ford master cylinder, upgrading a trailer brake master cylinder, or fitting a custom braking system, measuring the master cylinder correctly ensures compatibility and function.
    Hot Sale brake master cylinder
    What Is the Size of a Brake Master Cylinder?
    The "size" of a brake master cylinder typically refers to its bore diameter, which affects the volume and pressure of brake fluid delivered to the brakes. Bore sizes are usually measured in inches or millimeters (e.g., 7/8", 1", 25.4mm). 1"=25.4mm.

    How to Measure It
    Remove the Master Cylinder (If Necessary)
    In most cases, you'll need to remove the master cylinder from the vehicle to get an accurate measurement. Be sure to drain any remaining brake fluid safely before removal.

    Inspect the Bore Size Marking
    Some Top brake master cylinder models have the bore size stamped or cast directly on the body. Look for numbers like “1.00” (indicating a 1-inch bore).

    Manual Measurement
    If no marking is visible, you can measure the bore directly:
    Remove the reservoir (if detachable).
    Use a caliper to measure the internal diameter of the cylinder bore.
    Make sure to measure at the widest internal point for accuracy.

    Check Manufacturer Specifications
    If you know your vehicle’s make and model, you can look up the specifications in the service manual or parts catalog to identify the correct master cylinder size.

    Why Size Matters
    Using the correct size ensures proper brake pressure and pedal feel. For instance, a trailer brake master cylinder must deliver sufficient volume to multiple wheel cylinders or calipers, often requiring a different size than a passenger vehicle master cylinder.

    If you really don't know the size of the brake master cylinder, you can consult the brake master cylinder manufacturer KOMP. With 24 years of manufacturing experience , one-year or 30,000 km warranty and 24-hour online service, KOMP has become a trusted name among auto parts retailers.

  • How to Replace a Fiat 500 Clutch Slave Cylinder?

    How to Replace a Fiat 500 Clutch Slave Cylinder?

    If your Fiat 500’s clutch feels soft, spongy, or is losing pressure, it may be time to replace the Fiat 500 clutch slave cylinder. This crucial component is part of the hydraulic system that engages and disengages the clutch, and when it fails, gear changes become difficult or impossible. Here’s a step-by-step guide to replacing it safely and efficiently.
    Clutch slave cylinder China
    Tools & Materials Needed:
    Jack and jack stands
    Socket and wrench set
    Line wrench
    Brake/clutch fluid (DOT 4)
    Replacement clutch hydraulic slave cylinder
    Bleeder kit or vacuum bleeder
    Safety gloves and goggles

    Step-by-Step Replacement Process:
    1. Prepare the Vehicle:
    Park on level ground, disconnect the battery, and raise the vehicle securely using jack stands. Remove the front wheels for better access.

    2. Locate the Slave Cylinder:
    On many Fiat 500 models, the clutch hydraulic slave cylinder is inside the bell housing, integrated with the clutch release bearing. If so, removing the transmission is necessary.

    3. Remove the Transmission:
    This includes disconnecting the gear linkage, drive shafts, and any wiring or brackets. Unbolt the transmission and carefully lower it using a jack or assistance.

    4. Replace the Slave Cylinder:
    Disconnect the hydraulic line using a line wrench to avoid damaging fittings. Unbolt the old slave cylinder and install the new one, tightening bolts to manufacturer torque specs.

    5. Reassemble the Vehicle:
    Reconnect the hydraulic line, reinstall the transmission, and reattach all disconnected parts. Refill the clutch reservoir with DOT 4 fluid.

    6. Bleed the Clutch System:
    Use a bleeder kit to remove air from the system. Proper bleeding is crucial to restoring pressure.

    7. Test the System:
    Start the engine and press the clutch. It should feel firm and responsive. Take a short drive to confirm smooth shifting.

    Final Tip:
    Choose a trusted clutch slave cylinder supplier to ensure durability and performance. If you're not confident handling the transmission removal, it’s wise to seek professional help.

    Replacing a Fiat 500 clutch slave cylinder takes time, but with care and the right tools, it’s a manageable task for experienced DIYers.

  • Maintain your air compressor with Coolworks

    Coolworks filters perform exceptionally well in terms of durability and filtration efficiency.

    It can significantly extend the service life of air compressor equipment and reduce maintenance costs.

    .

    ⭐The Coolworks filter can not only effectively filter out impurities in the air,

    Separate oil and gas

    It can also better protect the equipment from damage.

    .

    ⭐Whether it is industrial sites such as mining or metallurgy,

    Choosing Coolworks filters is a wise choice.

    ⭐Let's maintain your air compressor equipment together.

  • More Than Just a Product—A True Spray Booth Solution

    At Spray Systems, we know that choosing an automotive spray booth is more than just purchasing equipment—it’s about investing in a high-performance solution that meets your business goals. That’s why we focus on innovative engineering, custom spray booth design, and a collaborative, customer-first approach. Whether you run a 4S shop, auto body repair center, or are expanding your car refinishing facility, our mission is to deliver a spray booth that performs beyond expectations.


    Our 7-Step Spray Booth Purchasing Process

    Purchasing the right car spray booth can be complex. To make the decision easier, we’ve created a proven 7-step process to guide you from start to finish. Here’s what to expect:


    Step 1: Understanding Your Business Needs

    We begin with a detailed discovery call led by a Booth Specialist. Whether you need a downdraft spray booth for cars, a crossdraft booth, or a custom size for your workspace, we take the time to understand your operation, including your paint quality standards, industry, previous spray booth issues, and production demands.


    Step 2: Identifying Key Challenges

    We work closely with you to identify space limitations, airflow needs, and code requirements. This ensures your spray booth installation will be smooth and fully compliant. We evaluate everything from workshop layout to ventilation needs to help you build a booth that grows with your production.


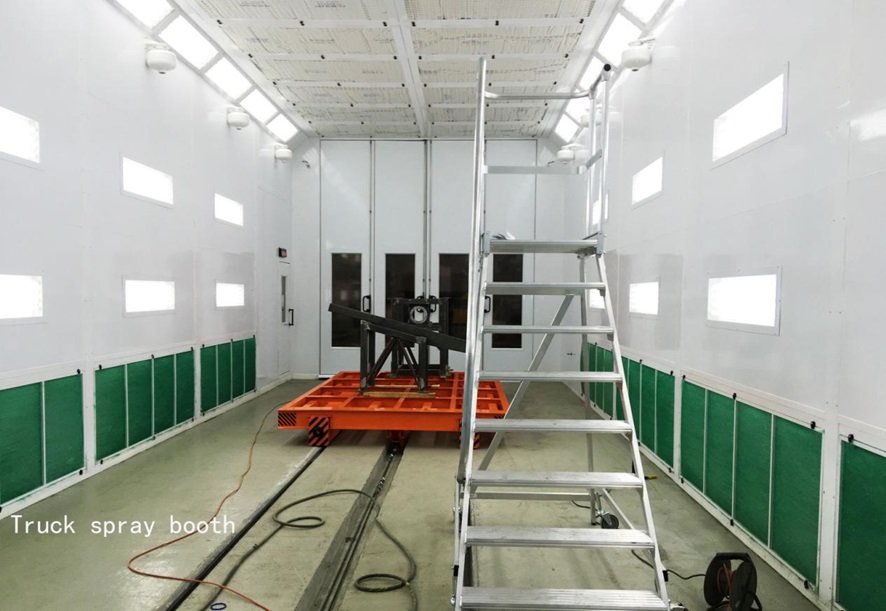
    Step 3: Selecting the Best Airflow Design

    Your spray booth’s performance relies heavily on airflow. We offer and explain options like crossdraft, semi-downdraft, and downdraft spray booths to match your finish quality expectations and energy efficiency goals. Our solutions are always code-compliant, cost-effective, and designed to enhance throughput.


    Step 4: Creating a Tailored Quote Package

    We deliver a detailed proposal that reflects your needs and expectations, including preliminary engineering, cost breakdowns, and system capabilities. You’ll get a clear picture of what your custom spray booth will include and how it will support your workflow.


    Step 5: Finalizing Your Design Plan

    After feedback, we revise and finalize your booth’s design and budget. We’ll confirm installation timelines and clarify any final details. Your custom paint booth design will be fully aligned with your operational strategy and budget.


    Step 6: Precision Engineering & Fabrication

    Once approved, we begin full engineering of your booth. You’ll receive 3D drawings and detailed specs for final review. After your approval, our factory fabricates your booth using durable, industrial-grade materials that meet or exceed European and North American quality standards.


    Step 7: Delivery, Installation & Support

    After quality checks, your spray booth is shipped and installed by our experienced team. We’ll handle setup, startup calibration, and provide full operator training. Our support doesn’t stop after installation—we offer ongoing assistance and spray booth troubleshooting to ensure long-term success. Check our successful case for Bentley 4S shop:


    Spray Booth Solution

  • How can you choose a paint booth?

    Paint booths are an enclosed space into which the piece to be painted is placed. This technology allows us to work in a controlled area, meaning one that's dust-free and generally clean; this way, we ensure that the object's paint doesn't become contaminated. It also helps us keep excess paint spray inside, preventing contamination of the exterior space. It's a way of protecting the environment.


    Additionally, the booth separates the different painting operations and "decontaminates" the area for the next object. Broadly speaking, it provides a clean environment for both the object and the operator. Some booths also function as a drying oven.

    Automotive Spray Booths


    Types of Paint Booths

    Paint booths can be classified according to the painting process they follow. Each one offers different advantages and disadvantages. Therefore, it is very important to understand the functions of each one before purchasing one. This way, you will be sure that it will fulfill your purposes. Our company is specially offering:


    In reality, many industries use them, and the traditional uses are as follows, but remember that you can get creative and give them a different use (as long as you are cautious).


    Paint for different car finishes: This is one of the most common uses. There are even different sizes of booths that can be used to paint vehicles of various sizes, from small cars to trucks.


    The use of paint booths ensures that the finishes from the application of paint, varnishes, etc., are of high quality, that is, lump-free and uniform in appearance, regardless of whether liquid or powder paint is being used.

  • Painting and drying cars in paint booths

    A paint booth for cars is a specialized room equipped for high-quality, professional car painting work, minimizing defects and accelerating the drying process of the coating.

    paint booth for cars

    1. Features of a car paint booth:

    *Temperature control: It is necessary to maintain the required temperature for the correct application of the base coat of enamel, transparent protective varnish. Temperature control ensures high-quality drying and polymerization of paints and varnishes.

    Air filtration. The paint booth is equipped with a powerful air filtration system to prevent dust and particles from entering the coating being painted, and to obtain a smooth, defect-free surface.

    *Humidity control: The optimal humidity level is within 40-50%, paint booths are able to maintain this indicator even with high evaporation of water during the drying process of the coating.

    High-quality lighting. The use of fluorescent lamps provides good shadowless lighting and uniform application of the coating.

    *Exhaust system: A powerful ventilation system and exhaust system are used to remove excess vapors and paint odors.

    *Control units: Professional chambers are equipped with control units that regulate the parameters of the painting process - air pressure, paint consumption, polymerization time.

    Box with preparatory zones. The chamber can be equipped with a zone for preparing the car for painting, including grinding, applying primer, and other stages.


    2. Types of paint booths for cars

    Painting equipment varies in design, there are two main types: downdraft paint booth or side exhaust through truck paint booth. Each of these types of paint booths is suitable for different purposes and tasks, the choice depends on the requirements of a specific car service or production.

    truck paint booth

  • Maintenance of excavator slewing bearing and swing circle

    Maintenance of excavator slewing bearing and swing circle

    Excavator slewing bearing also names turntable bearing,slewing circle,turntable circle,swing bearing,swing circle,slewing ring.

    The swing bearing is an indispensable transmission device in the slewing system of an excavator. Users who have used the slewing ring should know that a certain amount of wear and loss will occur after the support is used for a period of time. The main reason for the wear of the slewing ring of the excavator is :

    1. When purchasing a slewing bearing, the model is matched incorrectly. When the tooling is connected, the speed will not match, and the excessive load will cause the inner and outer teeth to wear;

    2. The swing circle is designed for the tooling model and the selection of materials. If the selection is improper, it will cause the slewing ring to wear faster.

    The following editor will introduce you to the maintenance and maintenance methods of the slewing ring

    1. Regularly check the pre-tightening force of the slewing ring bolts. The slewing ring is used for 100 hours to 500 hours, which is a working cycle. After the equipment is stopped, the bolt pre-tightening torque should be checked one by one. After a period of running-in period, every 1000 hours is a working cycle, stop the machine to check the bolt pre-tightening force.

    2. When the slewing ring is used, attention should be paid to the changes in operating noise. If there is noise in operation, it must be disassembled immediately to eliminate the fault;

    3. When pre-tightening the nut, evenly spread the lubricating oil between the bolt and the nut, and use the matching wrench to tighten it clockwise several times.

    4. When storing slewing bearings, they should be hoisted and stacked horizontally. Do not lift vertically to prevent deformation of the rolling ring;

    5. The bolts and nuts used in the slewing ring should be selected according to the bearing curve of the slewing ring bolts. When installing, the double nuts are tightened to prevent loosening.

    6. There are 4 oil cups distributed on the inner and outer ring gears of the slewing ring, and grease is added to the raceway from the oil cup. Under the guidance of Fenghe intelligent technicians, the slewing ring has a cycle every 50 hours. Each time you add grease, you must add enough grease until the grease leaks out of the seal.


    fortunepart slewing swing bearing for excavator model list

    Fit for Brand Excavator and bulldozer Model List
    KOMATS U PC20 PC30 PC35 PC40 PC45
    PC60-1-3-5-6-7 PC75 PC100-3-5 PC120-3-5 PC150
    PC200-1-3-5-6-7-8 PC220-1-3-5-6 PC240 PC300-1-3-5-6-7 PC350
    PC400-3-5-6 PC450 PC650 PC750 PC800
    CATERPILLA R E55/E55B E70/E70B E110/E110B E120/E120B E180
    E215 E225DLC E235 E240 E300B
    E307 E306 E305 E311/E312 E320/E200B
    E322 E324 E325 E330 E339
    E345 E349 E450
    HITACH I EX30 EX40 EX55 EX60-1-2-3-5 EX70
    EX100-1-3 EX120-1-3-5 EX150 EX200-1-2-3-5-8 EX220
    EX230 EX270 EX300-1-2-3-5-6 EX400-1-2-3-5 EX600
    UH043 UH052 UH053 UH07 UH081
    UH082 UH083 ZAXIS 60 ZAXIS 200-3-6 ZAXIS 240
    ZAXIS 270 ZAXIS 330 ZAXIS 360 ZAXIS 450 ZAXIS 870
    ZAXIS 110 ZAXIS 120
    BULLDOZER D20 D3 D30 D31 D3L
    D3C D37 D3D D4C D40
    D4D D4H D41 D45 D50/D5/D5B
    D53/D57/D58 D60/D65 D6D/D6 D6C D6H
    D65=D85ESS-2 D75 D7G/D7R/D7H/D7 D80/D85 D85A-12
    D8K D8N/R/L/T D9N D85EX-15 D150
    D155 D275 D355
    KATO HD80 HD140 HD250 HD400(HD450) HD550
    HD700(HD770) HD820(HD850) HD880 HD900 HD1023
    HD1220 HD1250 HD1430 HD2053
    SUMITOM O SH60 SH70 SH100 SH120 SH200
    SH210 SH220 SH280 SH300 SH320
    SH350 SH360 SH400 SH450 SH460
    LS2800FJ S340 S430
    KOBELC O SK60 SK70 SK75 SK07-N2 SK07/2/7
    SK100 SK120-3-5-6 SK125 SK160 SK200-1-3-5-6-8
    SK210 SK220-3-6 SK230 SK250 SK260
    SK300-3-6 SK320 SK330 SK400 SK480
    DAEWOO DH55 DH60 DH80 DH130 DH150
    DH200 DH220 DH215 DH220 DH258
    DH280 DH300 DH360 DH370-9 DH400
    DH420 DH500 UH07 K907C
    HYUNDA I R60 R80 R130-5-7 R150 R200
    R200-5 R210 R210-7 R215-7 R220-5
    R225-7 R260-5 R265 R290 R300-5
    R305 R320 R385 R420 R450-3-5
    VOLV O EC55B EC140B EC210 EC240 EC290B
    EC290B PRIME EC360 EC460 EC700
    KUBOTA KX35 KX50 KX85 KX135 KX155
    KX161
    DOOSAN DX60 DX200 DX300 DX340
    LIEBHERR R914 R916 R926 R934 R944
    R954 R964 R974
    YUCHAI YC35 YC60 YC85 YC135
    CASE CX55 CX75 CX135 CX240 CX360
    YM55 YM75 CX310
    TAKEUCHI TB150 TB175
    LIUGONG LG150 LG200 LG220 LG925 LG936
    SAN Y SY65 SY90 SY130 SY215 SY335
    SY365 SY6385
    XG60 XG80 XG120 XG200 XG330
    XG370
    SE210LC SE280LC
    Mitsubish i MS110/MS120 MS180 MS230 MS280


  • Practical replacement filter element for air compressors

    Discover the high-quality portable Air Compressor Parts Mann Filter Replacement 4930152101 4930153101 for efficient and reliable performance.

    These filters are designed to provide superior filtration, ensuring clean and contaminant-free air for your air compressor.

    Trust in the durability and effectiveness of Mann filters to keep your equipment running smoothly.

    Upgrade your air compressor with these premium parts now.